OverviewUser Creation allows Administrators to add new users to the platform.
|
Create a New User
You can create new users in QuoteToMe by assigning roles, permissions, and purchasing limits during setup. Follow the steps below to add a new user to your organization.
Step 1: Open the Create Menu
From the top-left navigation bar, select Create.

Step 2: Select Create User
At the bottom of the menu options, choose Create User.
Step 3: Enter User Information
Enter the user’s details, including:
Name
Email
All other required information
Important: Ensure the email is accurate. The invitation email will be sent to this address.

Step 4: Assign a Role & Purchasing Limit
Select a role for the user from the Role drop-down menu.
If the role you need isn’t listed, click Add roles here to create a new role.
When you assign a role, the Purchasing Limit field will automatically populate with the default value set in Roles & Purchasing Limits.
To change these default limits, update them in the Roles & Purchasing Limits page.
For more information, see Create and Edit Roles & Purchasing Limits.

Step 6: Choose a Permission Set
Select the permission set the user needs to access and use QuoteToMe features.
Step 7: Send the User Invitation
Click Create User to complete the setup.
The system will send an invitation email to the user.
The user must accept the invite, set a password, and activate their account.
Step 8: Configure Additional Settings (Optional)
You can choose to toggle additional user settings:
Buyer Role
Turning on Buyer allows the user to be selected as a buyer on requisitions.
Buyers create orders or issue POs from requisitions.

Add User to New Projects Automatically
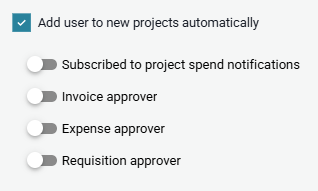
Enabling this option will:
Add the user to all newly created projects (not existing ones)
Allow admins to configure additional project settings for the user
Once enabled, admins can choose to toggle the following:
Subscribe User to Project Spend Notifications
If enabled, the user will be CC’d on all:
Purchase Orders
Change Orders
In-Store POs
Note:
- Applies only to newly created projects
- Users or admins can also toggle these on or off per project
Approver Settings (Invoices, Expenses, Requisitions)
Turning on these toggles will automatically make the user available as an approver for these order types on all newly created projects.
Note:
- Does not apply to previously created or previously joined projects
- Admins can also adjust this per project for users.
See Also

Need help?
Reach out to our Customer Support team:
- Call us toll-free at 1-833-712-5021
- Chat with us on our web and mobile apps